Tutorial:CreateMaps(Fnordia et al): Difference between revisions
No edit summary |
No edit summary |
||
| Line 1: | Line 1: | ||
'''Original by aGorm, with help from LathanStanley'''<br> | '''Original by aGorm, with help from LathanStanley'''<br> | ||
<!-- BEGIN COMMENT | |||
Where possible I (rjn945) have replaced HTML with wiki markup. | |||
A quick guide to wiki markup is available at: | |||
http://taspring.clan-sy.com/wiki/Help:Editing | |||
In short: | |||
Use #'s for numbered lists | |||
Use *'s for unnumbered lists | |||
And replace <br>'s with blank lines | |||
aGorm... Fair enough.. thanks for the clean up. | |||
END COMMENT --> | |||
==The Idea== | ==The Idea== | ||
Revision as of 14:08, 8 May 2006
Original by aGorm, with help from LathanStanley
The Idea
First of all you need an idea. There is no point (OK, there is some point for test purposes) in making a map just like another one that already exists. You need to think of certain things before you make your map.
- Is this map idea different, not just a copy of someone else's?
- Does my map idea give each player a fair share of the cover and high ground?
- Is my map idea possible to make?
- Is it possible with the amount of time I'm willing to spend?
If you answered yes to the above, then you are 25% of the way towards making your map!
You should probably doodle it on a piece of paper to act as a guide later.
The Tools
With your idea hopefully sketched out, it's time to get the tools to make the map! (You can skip this if you already have them.)
For all your map compiling needs you should first download the newest MapConv program.
You will also need some image editing software. Favorites are Photoshop, the GIMP, And Paintshop Pro. The GIMP, however, is the only one that's free! (I'm going to have to assume you know how to use the program you choose. If you can't there are loads of tutorials on the net.)
You may also want to check out Terragen for generating terrain. But as you have to pay to render anything of a good size, I won't mention it other than here.
Another tool you might find useful is the freeware tool TerrTexGen. It's useful for previewing your heightmap before compiling, but unless your texturemap is 4096 on both sides, you might find that the texturemaps that it creates are too small.
Finally, there is tool called L3DT which you might also find useful. It seems to be a program that is specificly designed for creating large height/texture maps. The free version is capable of rendering a heightmap as big as 4096x4096, and can generate a texturemap that is proportional to the heightmap. Of the mentioned packages, this seems the most useful and complete.
Preparing your map
This is the fun part! And also, often, the longest part.
For a map you will need several different things:
- a texture map
- a height map
- a metal map
And several optional things for added functionality:
- a tile map
They all have certain needs! Read this bit carfully!
Texture Map
All maps are based on a texture image. This image's width and height must be an exact multiple of 1024 pixels. So, for instance, you can have a "4096 by 8192" image, but not a "4096 by 4608" image, as 4608 does not divide by 1024. It, like all three maps, must be saved as a 24 bit BMP. A 1024x1024 Texture will produce a map shown as '2x2' in the launcher.
It may look like whatever you want! Find a texture (preferably, one that you can tile seamlessly) and fill your texture map with it. You could, for instance, fill the whole image with a sand texture. This would make your whole world look like sand. You could then decide to add a few patches of grass to it by finding a suitable grass texture and adding it on in patches. So you'd have a map that was mostly sand with a few patches of green.
Because of the way the map compiler work, it will greatly reduce your map filesize if you use 32x32 tiles on your texture map. So, whenever you have to fill a large area with a repeating pattern, make sure the small square you're repeating is 32x32 (or a multiple of it).
Hey, wtf, Tile Map and Texture Map are about the same stuff, someone merge those section!!
Height Map
Next is the height map. This must be exactly one eighth (1/8) of the size of the texture map + 1 pixel! For instance, if the dimensions of your texture map are "4096 by 8192", divide 4096 and 8192 each by 8 and add one to the result of each. The result for this example would be "513 by 1025". The height map is a black and white BMP. Only use black and white, no colour! (well its better to work it as a greyscale image, and when saving to process, convert to rgb and save as bmp, that way you get a 24 bit bmp)
White areas are the tops of mountains; black areas are the sea floor or the bottom of valleys. The shades of grey between are the different heights between! When you draw your heightmap, make sure the white blends into the black with greys. I suggest you use the blur tool. If you have a white splodge in a patch of black you will have a very tall pillar that won't look natural at all!
Metal Map
Finally, you need a metal map. This is the same size as the height map, one eighth (1/8) of the size of the texture map + 1 pixel. On this one you paint down red (in verying degrees) to represent metal. So a red spot that is RGB(50,0,0) will provide about a 5th of the metal patch of red RGB(255,0,0) will give.
On this map you can also place green pixels. Each green pixel will create 1 geothermal vent. If you put down a green splodge you will get a cluster of geo vents! Only place 1 pixel.
Ensure you have all three saved as 24 bit BMPs and you're ready to convert it all to a map!
Tile Map
Tiles are basically repeating images. They are exactly the same. The map compiler, by comparing peices to the texture to each other, sees which little square tiles in your texture are exactly alike. If they are the same, instead of wasting precious harddrive and bandwidth space, the compiler sets a reference from on tile to the next. If your map is made out of only one small tile, repeating for the whole texture, the map will compress extreemly well. Down to only a few kilobytes. But this would look very boring. So most map makers use a variety of tiles to make their map more interesting. A good map maker will find a balance between looks and size.
To make a tile: Open up your image editing program. Create a new image. As the Spring engine uses a 32 pixel tile engine, you have to set your image size to 32 pixels, or a multiple of 32 pixels. Therefore, tile sizes should be one of the following: 32x32 pixels, 64x64 pixels, 96x96 pixels, 128x128 pixels etc. Tiles also do not have to be square, it is perfectly possible to make rectangular tiles. Tiles should also be seamless, so that when repeated do not seem to have an obvious edge.
Once you have created your tile, do a Fill operation with a texture. The texture of course is our tile that we have made in the previous step. If you do not know how to do this, ask around. Make sure to state which image editing software you use, so we can help you easier.
Now, once you have your basic tile down, add in different features on your map, such as mountains, rivers, seas, deserts, grasslands, or whatever your map has. Remeber, for smaler file sizes make these different features out of tiles as well. If you do all of this properly, you can get your file size down very small, and this will keep everyone happy.
MapConv.exe
Instructions pulled from the newest MapConv program. If all goes well, the MapConv.exe should create four new files: mini.bmp, mini.dds, yourmapname.smf, and yourmapname.smt
NaodW29-pre4a2081c35548138700000001
Mothers MapConv
The usage is the same as above, with the following exceptions: All features (including GeoVent/Tree/Grass) are now on their own FeatureMap. This is a 24bit bmp specified with the -f <featuremapname.bmp> flag. It should be 1/8th the resolution of your map. (i.e. 1 pixel smaller in each direction then your heightmap)
Tree's and GeoVents are placed on the green layer.
- 255 Places a GeoVent
- 200-215 Places tree types 1-16
MapConv will try to place these features in the exact spot you place them, it will then go into crackhead mode if it cannot.
Grass is the blue layer. The blue value maps to a 'pseudo-density' of the grass. The 'grass' map in the engine is very very low resolution, so be aware that you will not get nice linear results. 255=full grass, 0=no grass.
The red layer places 'Arbitrary Features,' aka wreckages. One pixel of red equals one feature. Red '255' gives you a feature of the first arbitrary type, 254 the second, 253 the third, and so on.
But what are these 'Arbitrary Features,' Im so confused!
They are 'features' found in the /features/All Worlds or /features/corpses filesystems. Which feature is 'type 1' is defined on a map-by-map basis via a new file called 'fs.txt'. This file should contain <cr> delimited feature names. The first line is the feature placed when a red=255 dot is found, etc.
Ok, Now what do I do?
If you are using any custom features, and/or you want to mod-proof your map, you should include them in the sd7 that you package the map in. The tree structure should look something like:
NaodW29-pre4a2081c35548138700000002
Without getting into modding/unit making I will say that the .tdf tells you the name of the .3do ("Object="), and the name of the 'feature' is in the top brackets. The .3do specifies the texture names. The engine looks for those texture names + 00 in either bmp or tga format in tatex.
Examples of a built-in XTA wreckage name would be armckfus_dead which would be looking for a tdf (likely armckfus_dead.tdf) that has a [armckfus_dead] section which then specified something like:
NaodW29-pre4a2081c35548138700000003
armckfus_dead.3do would then specify some texture like wreck01b which would go looking for either a wreck01b00.bmp<c/ode> or wreck01b00.tga file.
Start with this version of MapConv
or
This one
[I will clean this up and add more later --Mother]
Making your map work
This is the final push. Once Sharp map has finshed it will spit out a .sm2 file. This needs to be copyed to the MAPS folder in Spring. But you still need one more thing: an .smd file. Basically, this file tells the game things like the maximum metal, the light colours, the clouds, etc. (All the bits you were thinking that you hadn't done yet!)
I would suggest you copy the .smd of another map and fiddle with the settings until you get what you want. smd's can be opened in notepade or similar. Look at all the .smd's so you can get a jist of what each option does. Make sure both the .sm2 and .smd have the same file name then start up Spring (not the client!) in single-player mode and run the commanders script. Choose your map and away you go!
SMD Rundown
What follows is all that we (aGorm and LathanStanley) have figured out in the SMD's. Its by no means the be all and end all, but it's the next best thing.
- Goto Maps:SMD for a more detailed listing
General Map Information
- Description is just a short description of your map. Keep it simple.
- TidalStrength determines how much energy tidal generators will produce. A normal figure is around 20.
- Gravity, as you would expect, affects ballisitcs and how far units fly after an explosion.
- MaxMetal is the maximum amount of metal you will gain from one game square in 1 second from an area of metal that had a red value of 255 in your metal map. If making an old style metal deposit map, then this will be quite high: maybe 2 or 3. If you are making a new style metal-all-over-the-place-map, then it will be low: perhaps 0.2. Also for old style maps, you'll have to fiddle with the...
- ExtractorRadius, which is the area that is harvested by 1 metal extractor. For old style maps make this very small, so as they only take from one deposit.
Atmosphere, Water Colours
Each value (it would appear this bit is by no means gospel) is a representation of the RGB values for that parameter. It would appear to be relative, i.e. you can put in what ever numbers you like and the game will work out what you want.
The best way to go about it is to look at it as percentages.
The numbers 1, 0.5, 0.2 refer to 100% red, 50% green and 20% blue. But 2, 1, 0.4, will get the same result. Using numbers below one for all the numbers will result in the colour being less bright.
This is all a bit confusing so an example will be given:
NaodW29-pre4a2081c35548138700000004
In this example the sky is coloured with 20% red, 10% green, and 50% blue, approximatly RGB(51,25,127), resulting in a very deep night-time blue. Other colours are added to the initial sky colour. If you set your sun as being a pale yellow and it came out rather green, this is why.
One helpful tip is negative colour. That's right: you can type in a negative number for a colour and it will remove it from the base sky colour. Just be careful not to go below the original values or you may get a surprise.
The Sun System/Shadow System
The Sun System/Shadow System is quite a useful tool as well in making your maps look well done.
Within the .smd file there is a line:
SunDir=-1 1 -.5; //direction of sun (The part after the "//" is a comment)
The numbers "-1", "1", ".5" determine the angle and elevation of the sunlight system.
The first number is the X angle (East/West) (from -1 to 1) where any negative number means the sun is on the West (and therefore shadows will be cast east), and any positive number means the sun is on the East (and therefore shadows will be cast west), and if the number is 0 there are no east or west shadows, the sun is directly above you.
The second is its elevation, (0 to 1), this number is how far from the horizion the sun is, ignoring it's angle. Thus, 1 puts the sun directly overhead (while still casting angular shadows) and 0 putting it directly on the horizion.
The final number is the Z angle (North/South). (I know, I know, they wrote the engine with Y as elevation and Z as vertical. Don't blame me.) It is just like the East West positioning, where negative numbers put them on the North, and positive numbers put them on the South.
Example Usage: If you want the shadows in one of the boxes (your shadow casting surface is in the middle), use the numbers provided, or start from them and tweak the angle and sun height as seen fit.
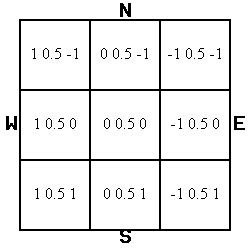
Note: on the current build, it will cast the shadows in the proper direction, etc. Negative direction numbers tend to make some maps unstable and cause crashes. The best solution would be to rotate or flip your map to where the shadows point up or right (North or West). I do believe these bugs are being worked on and will be fixed soon.
We can only hope this has been helpful! Any questions, or things you think we have missed, please ask us in the maps section.

Other Articles
Maps:Compiling is about properly compile and compress your map to a sd7 file.
If you need to know the inner workings of the Map_File_Format, thats a good place to find out.
IceXuicks Guide for creating maps: IceXuick_Map_Design_Help
